User Manual
Remote control
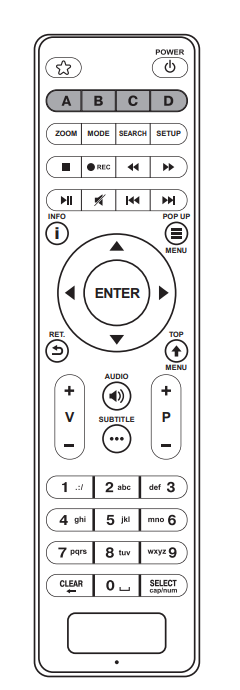
A (Red), B (Green), C (Yellow), D (Blue) — control various player functions.
PLAY/PAUSE (>||), STOP, PREV (<<|), NEXT (>>|), REW (<<), FWD (>>), REC, MUTE, AUDIO,
SUBTITLE, ZOOM, MODE, SEARCH, SETUP — control the playback and some other player functions.
Arrows ◄ ► ▲▼, ENTER, RET., TOP MENU, POP UP MENU, INFO — main buttons for controlling the player (navigate across the items on the screen, open/use the currently selected item, go back to the previous screen, go to the main menu, show/hide popup menu with actions for the currently selected item or the current player state, show/hide information about the currently selected item or the current player state, control some other player functions).
V+/V- (volume up / volume down) — adjust the volume.
P+/P- (page up / page down) — scroll up and down in various lists; control some other player functions.
0–9 — enter numbers and text; control some other player functions.
CLEAR — delete the last entered character, delete the currently selected item, control some other player functions.
SELECT — switch text input mode, add the item to the selection list, control some other player functions.
Installation
You can install the player on a horizontal surface. When installing the player in a hidden location, such as
enclosed cabinet or behind a TV set, you can use the IR extender cable to allow the infrared signal from the
remote control to reach the player.
Ensure there is enough space around the player for proper cooling. The space at each side should be not less
than 10 cm. When installing the player in an enclosed cabinet, please ensure proper airflow and cooling
inside
the cabinet.
Getting Started
Ensure the RC has batteries installed. Connect the player to your TV and to other A/V equipment in an
appropriate way. Use HDMI connection to get the best possible quality of video and audio. Make sure to
switch
off the player and all relevant A/V equipment before connecting them. Ensure your TV and other A/V equipment
are configured to use proper inputs. Connect the power cable to the player and switch the player on using
the
power switch on the back panel of the player.
The player will perform its initial loading procedure, which may take up to about 1 minute. During the
loading
procedure, a boot logo is shown on the TV screen.
1. If you do not see the boot logo on the TV screen when you switch on the player, it may mean some
problem with the connection between the player and the TV or that a wrong video input is chosen in
the TV or A/V receiver/switch. In this case, recheck the cables and the settings of the TV or A/V
receiver/switch, or try to use different cables or a different way of connecting the player to the TV.
2. If you see the boot logo on the TV screen when you switch on the player, but then the picture
disappears and the other picture does not appears during at least 10 seconds, it may mean that a
wrong video output mode is configured in the player. In this case, press the "MODE" RC button, and
then press one of the RC buttons "1", "2", "3", "4" or "5" to switch to a different video output mode
(see "Quick Setting of Video Output Mode" for more information).
Finally, you should see the initial setup wizard, which will allow you to perform the initial player
configuration.
After that you should see the main screen of the player menu. The main screen shows menu items which allow
the use of different player functions. Adjust the player settings as needed using "Setup" menu.
Quick Setting of Video Output Mode
The “MODE” RC button allows quick setting of video output mode without entering the player setup menu. This
way of video output configuration may be required if you see no picture on the screen after connecting your
player to a TV.
Press the “MODE” RC button and then one of the RC buttons “1”, “2”, “3”, “4”, or “5” to switch to one of the
following video output modes respectively:
1. Composite PAL
2. Composite NTSC
3. HDMI, 480i, 60 Hz
4. HDMI, 720p, 60 Hz
5. HDMI, 1080i, 60 Hz
After you see a picture on the TV screen, press the “ENTER” RC button, and then go to the player setup menu
to
perform a more precise configuration of the video output mode if needed.
NOTE: The procedure of quick setting of video output mode cannot be used during playback and in some other
cases. To ensure this procedure can be used, switch the player off, then switch the player on, and then wait
about 1 minute to ensure the player loading is finished. After that press "STOP" RC button to ensure
playback is
stopped. Then use "MODE" RC button.
Using TV/Video Applications
To use TV/Video applications, go to “TV” or “Video” or “Dune Store” sections (or other similar sections) of the player menu and check for available applications. The presence of such menu sections and the availability of applications may depend on a particular region and a particular firmware version.
Connecting USB Drives
To connect a USB drive, go to “Sources” section of the player menu and connect the USB drive to an USB port of the player. The player will recognize the USB drive, and will show an item corresponding to the USB drive on the main screen. When connecting a USB drive requiring significant power (such as USB HDD), use an external power supply for the USB drive. Power provided by the USB ports of the player may not be enough for correct functioning of the USB drive. Do not disconnect or switch off the USB drive when some write operation is in progress.
Formatting HDD
To format the HDD attached to the player, select the HDD item in “Sources” section of the player menu, press the “INFO” RC button and choose “Format Disk” (to format the entire disk) or “Format Partition” (to format an already existing disk partition only). Then choose the type of file system: if you want to use the HDD only with the player, “EXT3” is typically a good choice; if you want to connect the HDD to a Windows PC, “NTFS” is typically a good choice. The player will format the disk. To format an unformatted HDD, just press the “ENTER” RC button on the HDD item. NOTE: To use disks formatted by the player into “EXT2” or “EXT3” file system on a Windows PC, you may need to install additional software on the PC, such as “EXT2FSD” (http://www.ext2fsd.com/).
Switching the Player On and Off
To switch the player on and to switch it off completely, use the power switch on the rear panel of the player. To put the player into the standby mode, press the "POWER" RC button. To exit the standby mode, press this button again. Depending on the player settings (see the player setup menu), the "hardware standby" or "software standby" mode may be used. In the "hardware standby" mode, almost complete power-off takes place and the player consumes almost no power. In the "software standby" mode, the player produces no signal on the video output, but is still functioning. Exiting the "software standby" mode takes just a few seconds. When the player is in the "software standby" mode, it still consumes significant power. It is not recommended to keep the player in the "software standby" mode for a while if you do not need it. NOTE: After switching off the player completely or putting the player into the "hardware standby" mode, it is recommended to wait about 1 minute before switching it on again.
Wi-Fi Access Point function
The player can work as a Wi-Fi access point or Wi-Fi router. I.e. the player can connect to Internet via Ethernet and create its own Wi-Fi network which can be used by various devices (such as mobile phones, tablets, notebooks, etc) to communicate with the player and with each other and to access Internet. In order to use this, enable “Wi-Fi access point” function in “Setup / Network” menu.
Limitations
Compatibility of the player with a particular hardware (A/V equipment, network equipment, disk drives, etc) may depend on various factors (particular hardware model, specifics of hardware installation and usage, configuration of the player and the hardware, etc). If the player does not work correctly with a particular hardware, try to adjust the configuration of the player or hardware, try to use the hardware in a different way, or try to use some other hardware.Compatibility of the player with a particular media content (files, discs, etc) may depend on various factors (specifics of media content encoding, specifics of the configuration of the player, etc). If the player does not play a particular media content, try to adjust the configuration of the player, or try to use media content encoded in a different way.